Introduction
When it comes to setting up a successful solution, there’s nothing quite as crucial as having a good CI/CD process. CI/CD in general can be quite a daunting task, but luckily Databricks has us covered with Databricks Asset Bundles.
So, what is Databricks Asset Bundles? Think of Databricks Asset Bundles as a way to manage and deploy Databricks resources programmatically. With Databricks Asset bundles you take an IaC (Infrastructure as Code) approach by defining your jobs, pipelines, and notebooks within a project, and then use Databricks Asset Bundles to automatically deploy them into your selected environment.
Grasping the fundamentals of Databricks Asset Bundles and understanding how they integrate into a complete solution is essential for anyone starting their journey as a Databricks Data Engineer. This blog provides a beginner’s introduction to setting up your first Databricks Asset Bundle deployment and serves as a stepping stone for further exploration and deeper understanding.
Prerequisites
Before starting you will need to make sure Databricks CLI has been installed on your machine which can easily be checked by running:
`databricks –version`
If it is not installed, head over to Databricks CLI installation guide and follow the listed steps.
Before we create a project, we will need to set up our authentication which can be done by running:
`databricks auth login –host <workspace-url> –profile DEFAULT`
Once logged in, you can verify that your profile is valid by running:
`databricks auth profiles`
Setting Up Your First Databricks Asset Bundle Project
Now that we have confirmed that Databricks CLI is installed and we have authenticated our account, we can now start working with Databricks Bundles. For this tutorial I will be using Visual Studio Code, but feel free to use what you prefer. Start by running:
`databricks bundle init`
Choose `default-python`, give your project a name, and then choose `yes` for the remaining options. Once completed, we should have a basic Bundle Project all set up.
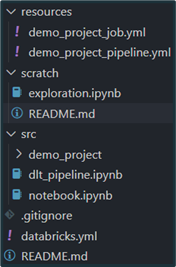
Our environment should now look like the screenshot on the right: 
• The `resources` folder contains the YAML files defining Jobs and Delta Live Tables.
• The `scratch` folder is used to develop notebooks which will be ignored by git.
• The `src` folder contains the notebooks which will be used by the Jobs and DLT’s.
• The `databricks.yml` file is the asset bundle definition for the whole project which specifies which resources to deploy and to which target.
Deploying Your Asset Bundle
Deploying our environment is now quite straightforward since our resources are defined in YAML. First, we need to validate our code, which can be done by running the following command:
`databricks bundle validate -t dev -p DEFAULT`
Note: We use `-t dev` to target the development environment defined in our `databricks.yml` file, however, this could be changed to `prod` or any other target you’ve defined. We also use `-p DEFAULT` to specify the authenticated profile we previously created.
Running this validation command will provide a summary of our bundle and will output any warnings if issues are detected. Once we have validated our bundle and ensured that everything is functioning correctly, we can proceed to deploy our environment by running:
`databricks bundle deploy -t dev -p DEFAULT`
After the deployment is complete, you should verify that the environment has been successfully deployed to your Databricks environment. Since we deployed into the `dev` target, which is set to `mode: development` the deployed resources will be prefixed with `[dev my_user_name]`, job schedules and triggers will be paused by default, and the ‘development’ mode will be applied to our DLT pipelines.
Although we initially deployed our environment manually, this process can be automated in Azure DevOps by following the same steps: authenticate, validate the bundle, and deploy the environment. The main distinction in automation is the use of a service principal for authentication, rather than a user profile.
Conclusion and Next Steps
If you’ve followed along, you should now have successfully deployed your own Databricks environment using Databricks Asset Bundles and seen just how straightforward the process can be.
From my experience, investing the time upfront to implement Databricks Asset Bundles can pay off significantly. The extra effort in the initial stages will make the transition from development to testing and production much smoother, saving you time and effort in the long run.
While this serves as a solid introduction, we’ve only begun to explore the possibilities. There’s still much more to learn and master as you continue your journey with Databricks Asset Bundles.


