


Microsoft recently announced AI agent loop [3] for standard logic apps, a powerful improvement to traditional workflows. This game-changer feature transforms the design of cloud-based integration workflows and enables handling of unstructured data in ways not achievable with traditional logic apps, potentially resulting in reduced development effort. Building complex conditional logic with intricate expressions and multiple branches can often be challenging. Workflows may also fail under real-world data due to unexpected or invalid payloads that were not considered during development. An AI agent loop offers a potential solution to these challenges.
This blog explains what an AI agent loop is, how it works, and demonstrates its value through a simple business scenario.
What is AI agent loop?
AI agent loop [3] is a native feature offered in standard tier logic apps. All it needs is a set of instructions, user inputs, and the tools it needs to carry out the instructions. At its core, it combines generative AI (via OpenAI) with workflow orchestration, allowing a model like GPT-4 to act as a decision-making layer that magically carries out all the hard work for you using LLMs [5] behind the scenes. AI agent loop provides the ability to create autonomous agents, conversational agents, or even multi-agent systems.
Under the hood
Agent loop follows a cycle of think, act, and learn [2]. When thinking, it will use an OpenAI LLM to examine the goal and current context based on the instructions provided, while also deciding steps going forward. Next, it will act based on the tools you have provided and finally learn or reflect, where it will look at the results, feedback, and improve future responses.
Parameters in an agent
When creating the AI agent, you will need to feed the following:
- Agent instructions: Description of the agent’s roles and tasks in natural language
- System instructions – High-level overview of the business case
- User instructions (optional)
- Tools: List of actions the agent can use to carry out the instructions. These include over 1400 connectors. Each tool requires a title and a description in order to provide more context to the agent.
- Advanced Parameters (optional): Set of optional parameters
- Max token count[4] – Defines the maximum number of tokens (words or word fragments) the model can generate in its response.
- Frequency penalty – Reduces the likelihood of the model repeating the same lines or phrases within a response.
- Presence penalty – Encourages the model to introduce new topics by penalizing repetition of previously mentioned ideas.
- Temperature – Controls the randomness of the output i.e. higher values produce more creative results, while lower values make responses more focused and deterministic.
You don’t tell the agent how to do the task – simply tell what to do and provide the tools to get there.
The next section explores an integration scenario involving the extraction of relevant information from an email and its conversion into a CSV file, illustrating the basics of implementing an AI Agent Loop.
Business use case: Intelligent vendor invoice routing and validation
A company receives invoices from vendors via email. Each email should go through validation and extraction of relevant details to create a CSV and be added to a SharePoint folder. Subsequently, an email would be sent to the finance team. In case of any missing information, notify the support team.
In traditional logic apps, this would require:
- Structured data schemas to extract input/trigger data and to create the output CSV files
- Mapping to map the input data against the output CSV file
- Hard-coded error handling
- Conditional logic, lookups, and branching
Agentic approach
With the agentic approach, it only took 5-10 minutes to define the whole workflow on a standard logic app, which should have taken hours with traditional workflows. There is no need to hardcode any rules. All the hard work is handled by the agent.
Step-by-step Implementation
To understand these workflows a bit better, the following is a deep dive into creating an agentic workflow.
- First and foremost, prior to creating the logic app, provision an Azure OpenAI resource. In the Azure portal, search for OpenAI and create a new resource, providing a subscription, resource group, name, pricing tier, etc. In this case, the standard tier along with the East US region was used.
- In the OpenAI resource created, navigate to the AI Foundry portal to define the models.
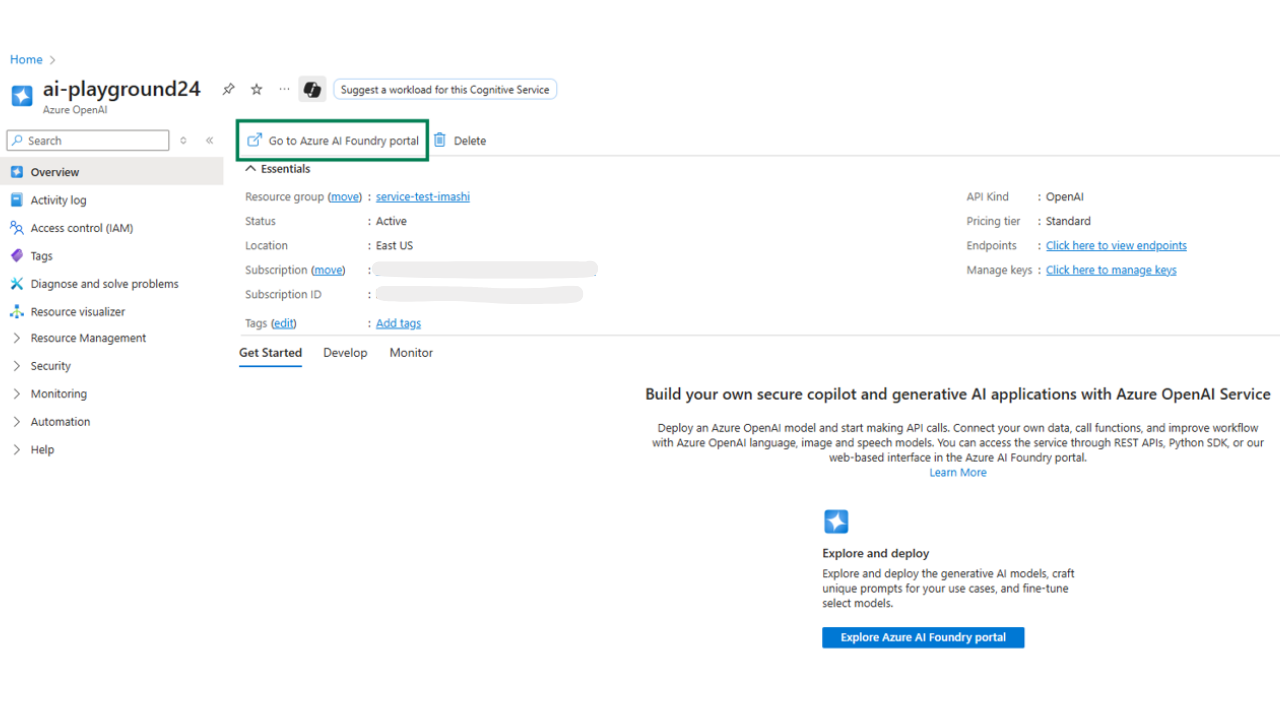
Figure 1 – Step 2: OpenAI resource with access to AI Foundry Portal
- Once in the AI foundry portal, create a new deployment model for the AI agent loop to use. Select the deployments tab under shared resources and select “deploy model” > “deploy base model”. For this demonstration, the gpt-4.1 model was used (For the list of supported models, see here). [1]
Video 1 – Step 3: Create a model with AI Foundry
- That’s it! Now let’s head to the important part: logic apps. The AI agent loop is only available in standard logic apps as at the time of writing October 2025. When creating a new workflow, select the new workflow type: Autonomous Agents, which is currently in preview.
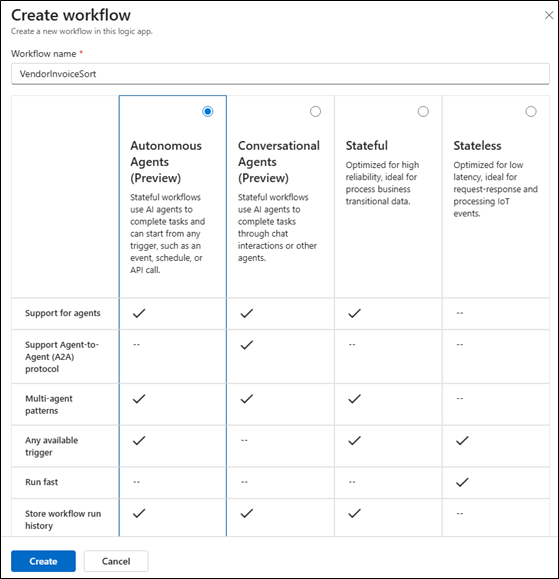
Figure 2: New Agentic workflow option provided
- After naming and creating the workflow, navigate to the designer. Notice the familiar trigger action followed by the new “Default Agent,” i.e., agent loop action.
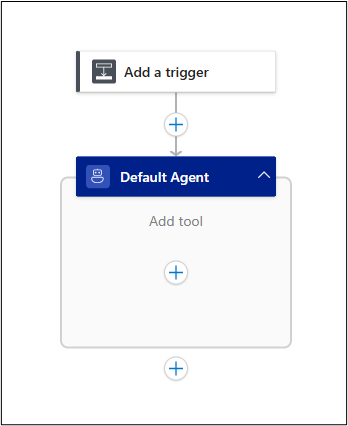
Figure 3 – Step 5: Familiar trigger followed by the agentic action
First, start by defining the trigger as usual. In our case, we will use the Outlook “when a new email arrives” action.
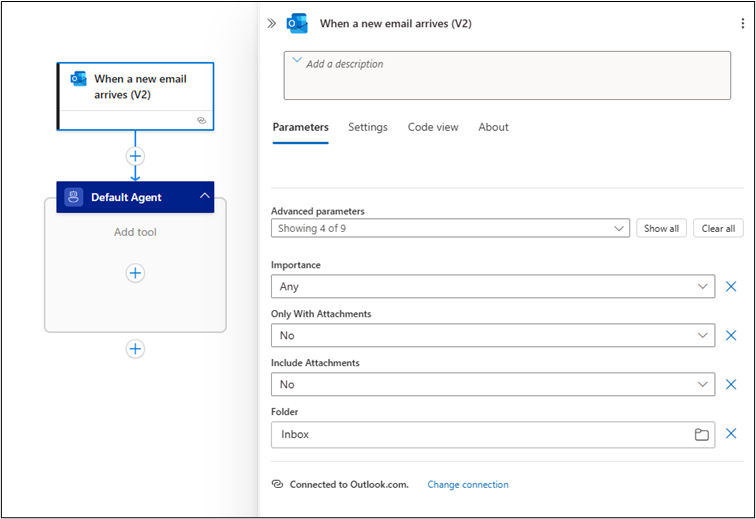
Figure 4 – Step 5: Defining the new Outlook trigger which monitors any new coming emails
- Next, consider the new Agent action. First, set up a connection against the OpenAI account created earlier so that the agent can make use of the GPT model. Azure offers two ways for authentication:
-
- URL and key-based authentication
- Managed service identity (Currently only supports system-assigned identity)
For this example, let’s use the first option. The API endpoint and API key should auto-fill once you define the OpenAI resource. If not, these details could be fetched from Resource Management > keys and the endpoint section of the OpenAI resource defined earlier.
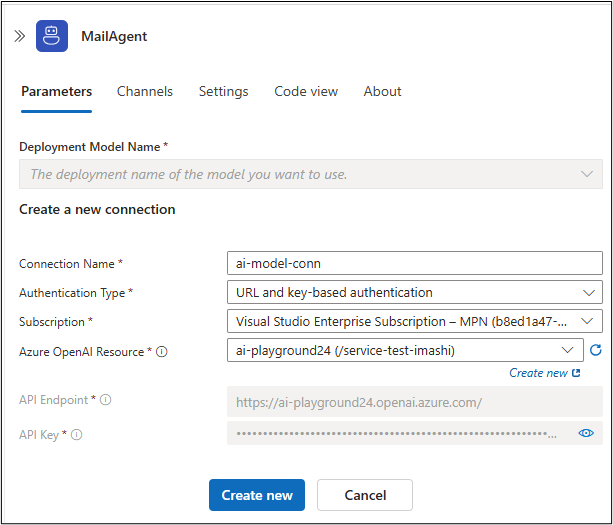
Figure 5 – Step 6: Authentication configuration for agent loop action
If the connection is correctly authenticated, you will be able to view the available models within the OpenAI resource. In this case, select the gpt-4.1 model defined earlier.
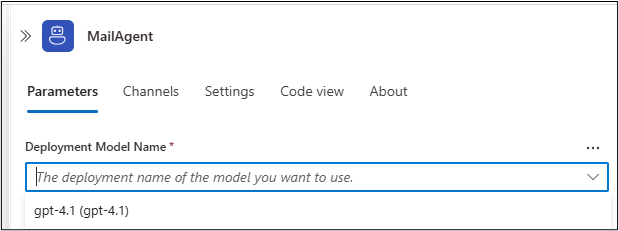
Figure 6 – Step 6: List of valid deployment models to select within the agent
-
- Now to the most important step – the agent setup: defining the instructions for the model. First, provide the system instructions – a high-level description of what you want the model to achieve. The following figure shows the prompt used for the vendor invoice scenario.
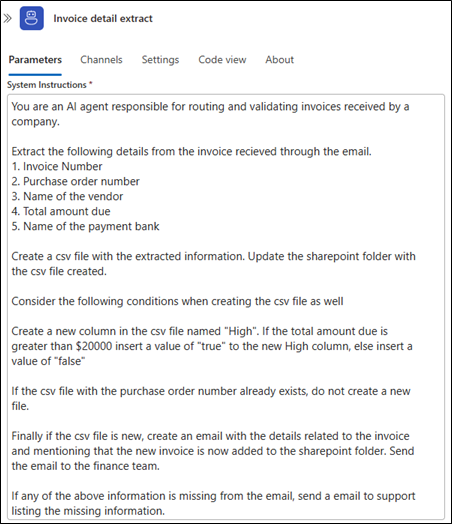
Figure 7 – Step 7: System instructions provided to the agent
The more detailed and specific the instructions are, the better the agent will perform.
Next, provide the user instructions. In this case, a sample vendor invoice is provided.
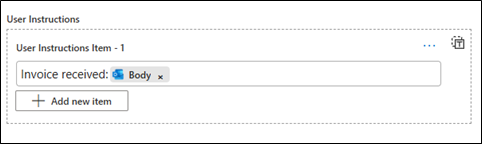
Figure 8 – Step 7: User instructions provided to the agent
- Finally, define the tools needed for the agent to perform its given tasks. The order doesn’t matter when defining these. Four tools were used within this workflow.
-
- Add file to SharePoint – The CSV file we have instructed the agent to create.
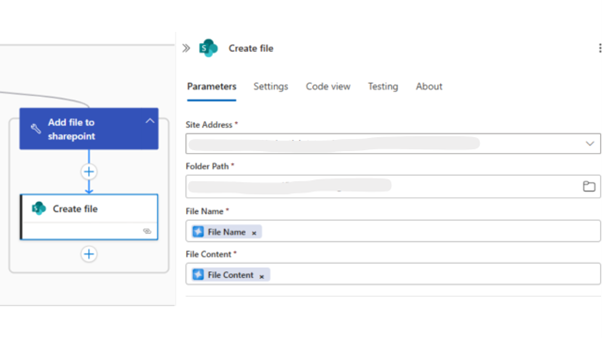
Figure 9 – Step 8a: Create Sharepoint file tool definition
When defining the values for the parameters needed to create the SharePoint file, you usually have to hard-code the file name, content, etc. But in these workflows, you can simply use agent parameters, which only need a high-level description of what the parameter should be about. For example, in the system instructions, the agent was advised to use the purchase order number as the file name. So, when declaring the agent parameter we can describe the file name as follows.
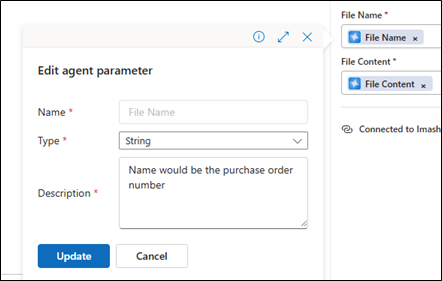
Figure 10 – Step 8a: Providing the agent parameters with detailed description
Furthermore, tool declarations require to insert a title and a description of the purpose of that specific tool, all in natural language. These provide more context for the agent. The more detail you provide, the easier it is for the agent to understand.

Figure 11 – Step 8a: Providing detailed description for the tool
- List existing purchase orders – Fetch purchase order files listed in SharePoint before to ensure no duplicates are created.
Video 2 – Step 8b: List SharePoint folder tool definition
- Send Email to finance – if the purchase order is valid, send an email.
Video 3 – Step 8C: Send Outlook email to finance tool definition
- Add file to SharePoint – The CSV file we have instructed the agent to create.
d. Send email to support – Notify support in case of errors.
Video 4 – Step 8d: Send Outlook email to support tool definition
Following is the final structure of this workflow.
-


Figure 13 – Step 8: Final workflow structure including all the tools defined
Done! No need for any conditional statements, schemas, complex mapping.
Results
Following is an invoice email used for testing with dummy data:

Figure 14: Email which triggers the workflow
The Agent chat will explain the steps taken in detail when processing the trigger input.

Figure 15: Workflow runs displaying the agent thought process
Positive test case
In the case where a valid invoice was provided, the SharePoint file was created as expected, and the following email was received:

Figure 16: Positive test case of the CSV being added to Sharepoint
If the email body needs to be better formatted or needs to follow a specific structure, adjust the instructions or parameters provided to the agent.

Figure 17: Positive test case of the email being sent to Finance
Negative test case
In case of any missing information or duplicates, the agent was able to intelligently identify those scenarios.

Figure 18: Negative test case of the email being sent to Support
Conclusion
AI agent loop represents a major step toward cognitive integration workflows. Developers can now build adaptive, intelligent workflows with minimal effort by leveraging the power of generative AI. As demonstrated in the invoice routing use case, what once took hours can now be accomplished in minutes.
As great as it sounds, be aware that these agents might make mistakes sometimes, so it might not be 100% accurate all the time. Beyond performance and accuracy, security is a key concern — sensitive data passed through AI-driven workflows may risk exposure if not properly safeguarded, prompts and responses could unintentionally reveal confidential information, and external model dependencies might introduce compliance or data governance challenges.
Despite these factors, Agentic workflows mark a powerful evolution in automation — they don’t just execute, they understand.
References
[1] https://learn.microsoft.com/en-us/azure/logic-apps/create-agent-workflows
[3] https://learn.microsoft.com/en-nz/azure/logic-apps/agent-workflows-concepts
[4] https://learn.microsoft.com/en-us/azure/logic-apps/create-autonomous-agent-workflows


