Overview
This is Part 1 of a 3-Part blog post that describes how to use the power of Log Analytics Workbooks to display tracking data that can be filtered, sorted, and even exported to Excel. The post will also show how related records can be listed in grids based on a selection in another grid.
See Part 2 – View Tracking Information in Azure Workbooks here.
See Part 3 – Automate Deployment for the third post.
See Part 3a – Automate Deployment – Terraform for the addendum to the third post.
Workbooks provide a flexible canvas for data analysis and the creation of rich visual reports within the Azure portal. They allow you to tap into multiple data sources from across Azure and combine them into unified interactive experiences.
The final result of this blog post exercise showing filtering and a related records grid

Background
Traditionally, Logic Apps has allowed tracking data to be logged from Actions. The tracking data is sent to Log Analytics when diagnostics are captured.
This approach has some disadvantages:
- Diagnostics must be turned on, even if you only want the tracking data.
- Tracking properties is “hidden” in Action Settings.
- Sampling can result in data being lost.
How to send data from a Logic App to a Log Analytics custom table is not covered here, but have a look at Azure Log Analytics Data Collector if you are interested.
Code for the Logic App used to generate sample data is included in the Appendix.
Step by Step Instructions
This exercise will show how to display Work Order records in a filterable grid. It is assumed a Log Analytics Custom table called WORKORDER_CL has been created and populated.
- First, create a Log Analytics Workspace:

2. Next, go to the new Workspace and click on Workbooks. Click +New.

3. In the new Workbook, enter a basic Kusto statement in the Logs Query window and click Run Query. Note that the query summarises by Work Order Number and chooses the latest record based on Timestamp. This is so the grid displays only the latest record for a Work Order.
WORKORDER_CL
| summarize
arg_max(TimeGenerated, *)
by WorkOrderNumber_s
| project WorkOrderNumber_s, WorkOrderType_s, Customer_s, WorkSummary_s, WorkDescription_s, InvoiceID_d, TimeGenerated
| order by TimeGenerated desc
Result:

4. Click Save and Done Editing.

You will be prompted for a name and location:
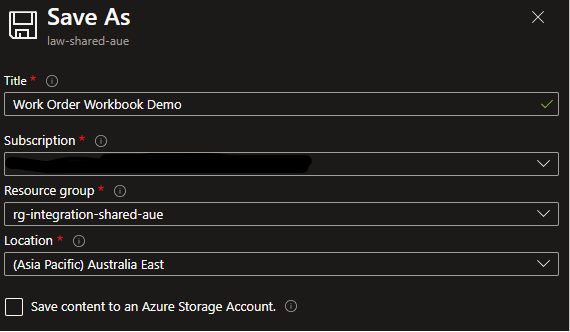
Click Apply and you will be shown your new workbook:

Notice the Edit buttons on the right-hand side. A workbook can be made up of multiple areas that can each be edited. Click the ellipsis to see the different options:
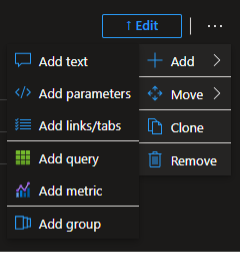
5. For now, click Edit in the top section, which is basically a header, and change the text as follows. You can click Preview to see how the markdown will render:
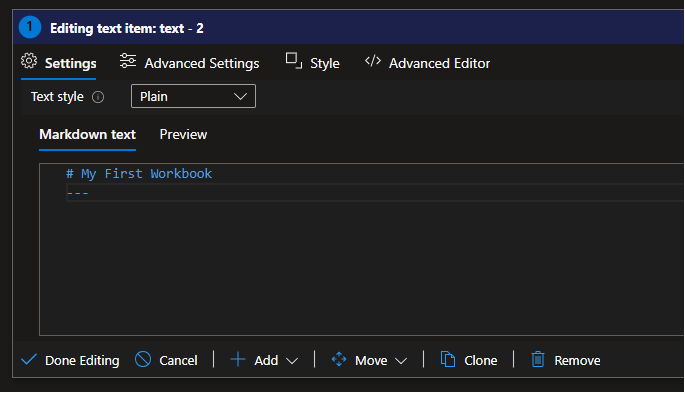
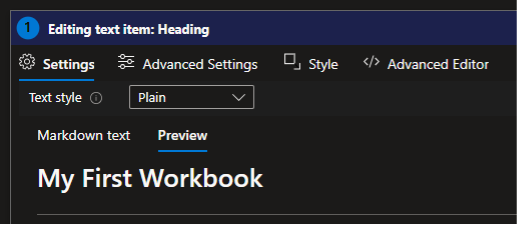
6. The default item name is “text – 2” but this can be changed in the Advanced Setting. Here I have changed it to “Heading”:
7. Click Done Editing

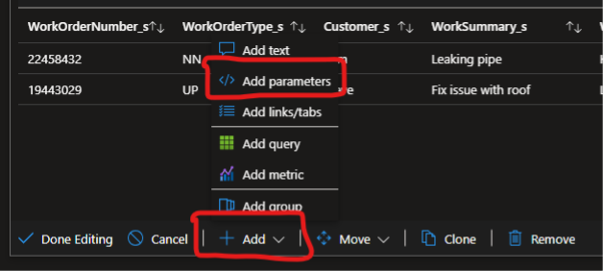
8. Now add a filter for the grid. Click Edit under the grid, then click +Add, and select </> Add parameters.
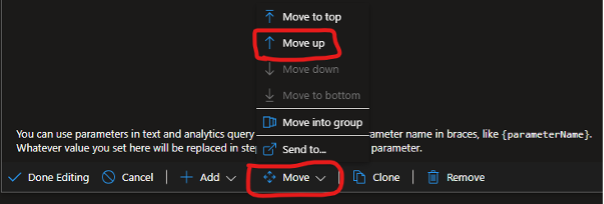
9. Now click Move and select Move up to place the filter area just above the grid.
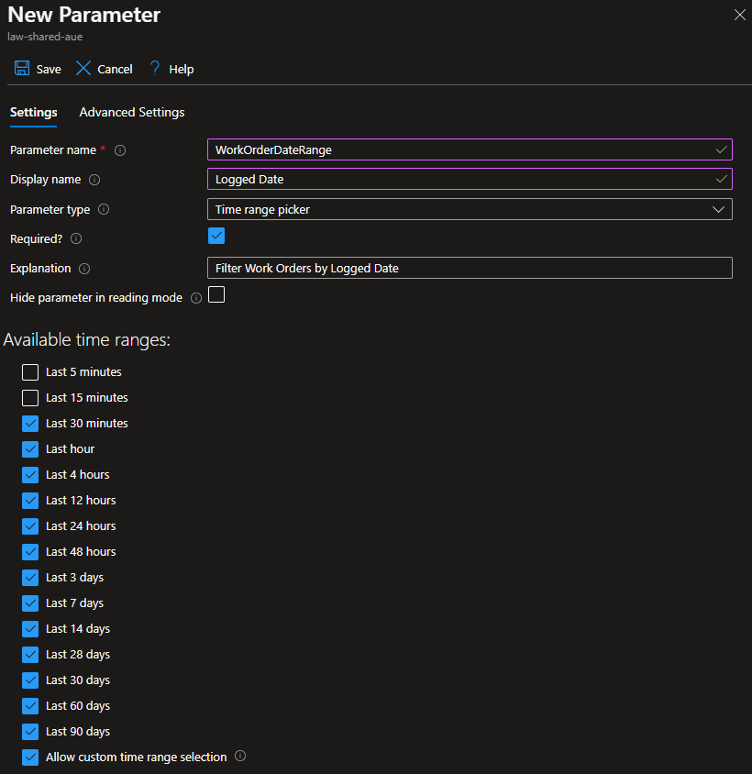
10. Add a date range parameter by clicking Add Parameter. Note that there are several parameter styles, but leave as the default for now (Pills):

11. Fill in details as follows and then click Save. Explore the Parameter types available but choose Time range picker for this parameter:
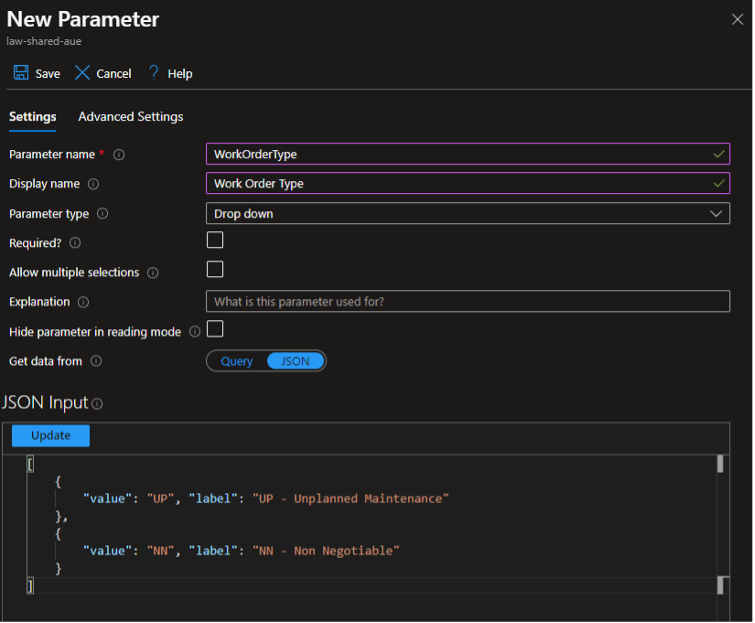
11. Click Add Parameter again and add a Work Order Type filter. This will be a Drop down parameter populated from a JSON array. Note that a query could be used to populate the drop-down parameter.
12.Click Save
13. Click Advanced Settings and name the step “Work Order Parameters”.
14. Click Done Editing for the parameter section, click Save and Done Editing at the top level.
You should notice two things: One, the Logged Date parameter shows a warning mark and two, the parameters have no filtering effect on the grid.

A date/time parameter can have a default value set, but you must dive into the Advanced Editor and set a value in milliseconds:
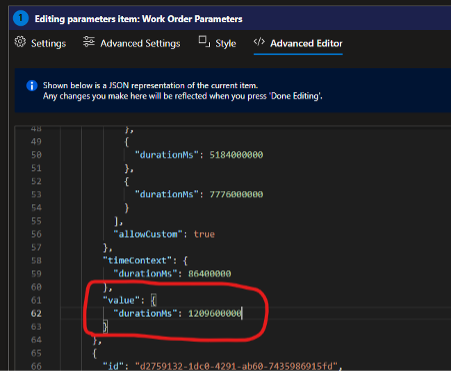
For the parameters to filter the grid, a parameter section must be in the same group as the grid (at least for this demonstration).
A field must also be projected to take part in filtering. Notice also that LoggedDateTime is missing.
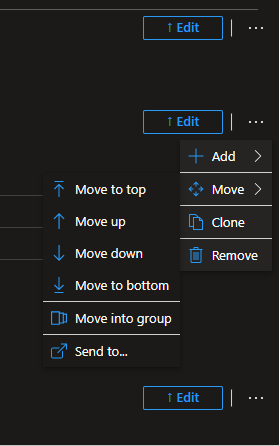
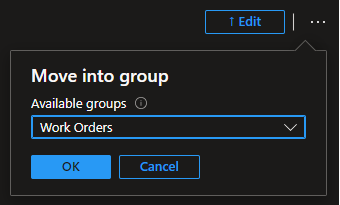
15. Move the parameters section into a new group. Click Edit at the top of the screen, click the ellipsis beside the parameter Edit button, click Move > and select Move into group.
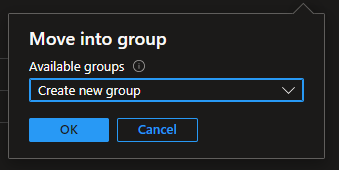
16. Click OK to create a new group:
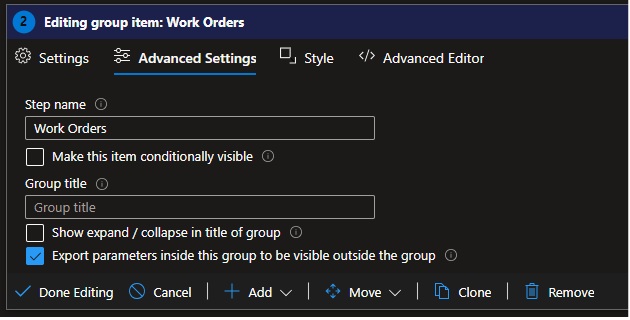
17. Change the group name to “Work Orders” in Advanced Settings and make parameters visible outside the group. Click Done Editing:
18. Move the Work Order grid into the same group.
19. Edit the Work Order grid Kusto query to apply parameter selections. Notice the parameter syntax in the now added where clause:
WORKORDER_CL
| summarize
arg_max(TimeGenerated, *)
by WorkOrderNumber_s
| project WorkOrderNumber_s, WorkOrderType_s, Customer_s, WorkSummary_s, WorkDescription_s, InvoiceID_d, LoggedDateTime_t, TimeGenerated
| where LoggedDateTime_t {WorkOrderDateRange} and WorkOrderType_s has "{WorkOrderType}"
| order by TimeGenerated desc
20. Save all changes and click Done Editing. Play around with the data and work order type filtering.

21. As a bonus, enable exporting in the Work Order query Advanced Settings:
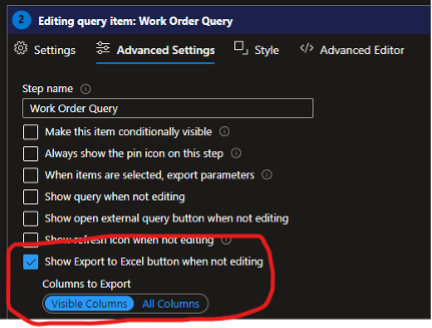
A download icon will appear to the right of the grid.

Summary
This concludes Part 1 of the 3-Part blog post – the creation of a clean, filterable, sortable (just click on a header), and exportable work order grid.
Part 2 will demonstrate how to add a second grid containing work order status updates populated based on the selection in the Work Order grid.

Appendix
{
"definition": {
"$schema": "https://schema.management.azure.com/providers/Microsoft.Logic/schemas/2016-06-01/workflowdefinition.json#",
"actions": {
"Initialize_variable_WorkOrders": {
"inputs": {
"variables": [
{
"name": "WorkOrders",
"type": "array",
"value": [
{
"Customer": "Steve",
"InvoiceID": 70045,
"LoggedDateTime": "2024-03-01T16:47:07+12:00",
"WorkDescription": "Leaking into bathroom",
"WorkOrderNumber": "19443029",
"WorkOrderType": "UP",
"WorkSummary": "Fix issue with roof"
},
{
"Customer": "Pam",
"InvoiceID": 70045,
"LoggedDateTime": "2024-03-05T12:46:07+12:00",
"WorkDescription": "Ktichen sink leaking into cupboard",
"WorkOrderNumber": "22458432",
"WorkOrderType": "NN",
"WorkSummary": "Leaking pipe"
}
]
}
]
},
"runAfter": {},
"type": "InitializeVariable"
},
"Initialize_variable_WorkOrdersStatuses": {
"inputs": {
"variables": [
{
"name": "WorkOrdersStatuses",
"type": "array",
"value": [
{
"Status": "NEW",
"StatusDateTime": "2024-03-01T16:47:07+12:00",
"WorkOrderNumber": "19443029"
},
{
"Status": "REVIEW",
"StatusDateTime": "2024-03-02T10:29:07+12:00",
"WorkOrderNumber": "19443029"
},
{
"Status": "NEW",
"StatusDateTime": "2024-03-05T12:46:07+12:00",
"WorkOrderNumber": "22458432"
},
{
"Status": "REVIEW",
"StatusDateTime": "2024-03-05T02:28:01+12:00",
"WorkOrderNumber": "22458432"
},
{
"Status": "ONSITE",
"StatusDateTime": "2024-03-07T09:05:00+12:00",
"WorkOrderNumber": "22458432"
},
{
"Status": "COMPLETE",
"StatusDateTime": "2024-03-07T11:22:19+12:00",
"WorkOrderNumber": "22458432"
}
]
}
]
},
"runAfter": {
"Initialize_variable_WorkOrders": [
"Succeeded"
]
},
"type": "InitializeVariable"
},
"Log_Each_Status": {
"actions": {
"Send_Work_Order_Status_Data": {
"inputs": {
"body": "@{items('Log_Each_Status')}",
"headers": {
"Log-Type": "WORKORDERJOBSTATUS"
},
"host": {
"connection": {
"name": "@parameters('$connections')['azureloganalyticsdatacollector']['connectionId']"
}
},
"method": "post",
"path": "/api/logs"
},
"runAfter": {},
"type": "ApiConnection"
}
},
"foreach": "@variables('WorkOrdersStatuses')",
"runAfter": {
"Log_Each_Work_Order": [
"Succeeded"
]
},
"type": "Foreach"
},
"Log_Each_Work_Order": {
"actions": {
"Send_Work_Order_Data": {
"inputs": {
"body": "@{items('Log_Each_Work_Order')}",
"headers": {
"Log-Type": "WORKORDER"
},
"host": {
"connection": {
"name": "@parameters('$connections')['azureloganalyticsdatacollector']['connectionId']"
}
},
"method": "post",
"path": "/api/logs"
},
"runAfter": {},
"type": "ApiConnection"
}
},
"foreach": "@variables('WorkOrders')",
"runAfter": {
"Initialize_variable_WorkOrdersStatuses": [
"Succeeded"
]
},
"type": "Foreach"
}
},
"contentVersion": "1.0.0.0",
"outputs": {},
"parameters": {
"$connections": {
"defaultValue": {},
"type": "Object"
}
},
"triggers": {
"manual": {
"inputs": {},
"kind": "Http",
"type": "Request"
}
}
},
"parameters": {
"$connections": {
"value": {
"azureloganalyticsdatacollector": {
"connectionId": "/subscriptions/XXXXXXXX-XXXX-XXXX-XXXX-XXXXXXXXXXXX/resourceGroups/rg-integration-shared-aue/providers/Microsoft.Web/connections/azureloganalyticsdatacollector",
"connectionName": "azureloganalyticsdatacollector",
"id": "/subscriptions/XXXXXXXX-XXXX-XXXX-XXXX-XXXXXXXXXXXX/providers/Microsoft.Web/locations/australiaeast/managedApis/azureloganalyticsdatacollector"
}
}
}
}
}


